
Săptămâna trecută am postat un model de unghii pentru iarnă şi m-am gândit ca azi să continui cu altul în aceeaşi temă.
Last week I posted a winter nails design and I thought that today to continue with another in the same theme.
Last week I posted a winter nails design and I thought that today to continue with another in the same theme.
Ai nevoie de : Un lac de bază pentru a-ţi proteja unghiile naturale, un lac alb pentru fulgii de nea şi omul de zăpadă, două nuanţe diferite de verde pentru brad, unul roşu pentru îmbrăcămintea omului de zăpadă şi pentru globuri, unul galben pentru stea, unul portocaliu pentru nas şi unul transparent care va fi folosit doar la sfârşit pentru a uniformiza modelul ..şi, desigur, mai ai nevoie de o pensulă subţire pentru fulgii de nea şi pentru detalii, dar şi de un instrument pentru puncte cu vârfuri diferite ca mărime. Am mai folosit un lac transparent cu sclipici fin de culoare aurie pentru french, însă oricare dintre culori se pot înlocui cu altele care se folosesc în acest sezon.
You need : A base coat to protect your natural nails, a white polish for the snowflakes and the snowman, two different colors of green for the Christmas tree, one red for the snowman's clothes and for the globes, a yellow polish for the star, a orange polish for the nose and a top coat which I used at the end ..and, of course, you need a thin brush for the snowflakes and for the details, but also a dotting tool with different sizes. I used a clear nail polish with fine gold glitter for the french, but any of the colors can be replaced with others which are used in this season.
You need : A base coat to protect your natural nails, a white polish for the snowflakes and the snowman, two different colors of green for the Christmas tree, one red for the snowman's clothes and for the globes, a yellow polish for the star, a orange polish for the nose and a top coat which I used at the end ..and, of course, you need a thin brush for the snowflakes and for the details, but also a dotting tool with different sizes. I used a clear nail polish with fine gold glitter for the french, but any of the colors can be replaced with others which are used in this season.

Eu am folosit : Farmec #301 pentru bază, Farmec #50 pentru omul de zăpadă, fulgi şi unele dintre globuri, Farmec #363 pentru nas, Farmec #352 pentru fular, căciulă şi globuri, Gabrini #369 pentru french şi fulgi, Rimmel London #835 pentru brad, Rimmel London #080 pentru ochi, nasturi şi detalii, Farmasi #125 pentru stea, Farmasi #122 pentru brad, Flormar pentru uscare rapidă şi extra strălucire, şi nu în ultimul rând o pensulă subţire #00 şi un instrument pentru puncte.
I used : Farmec #301 for base, Farmec #50 for the snowman, the snowflakes and some of the globes, Farmec #363 for the nose, Farmec #352 for the neckcloth, the hat and the globes, Gabrini #369 for french and the snowflakes, Rimmel London #835 for the Christmas tree, Rimmel London #080 for the eyes, the buttons and the details, Farmasi #125 for the star, Farmasi #122 for the Christmas tree, Flomar for quick dry and extra shine, and finally, a thin brush #00 and a dotting tool.
De fiecare dată înainte să începi o manichiură, asigură-te că unghiile sunt foarte bine şterse de lac şi în totalitate degresate pentru ca modelul să reziste mai mult timp. Aplică baza pe toată lungimea unghiilor, încercând să eviţi pe cât posibil atingerea cuticulelor cu lac:
Every time before you begin your manicure, make sure that your nails are totally clean, so that your model will resist more time. Apply the base coat over the entire nail, trying to avoid as much as possible to touch the cuticles:

Pe degetul mic, arătător şi mare eu am făcut acelaşi model. Am început prin a face french-ul cu lacul transparent cu sclipici fin auriu :
On the little finger, the index and the thumb I made the same model. I began with the french and I used the fine gold glitter:

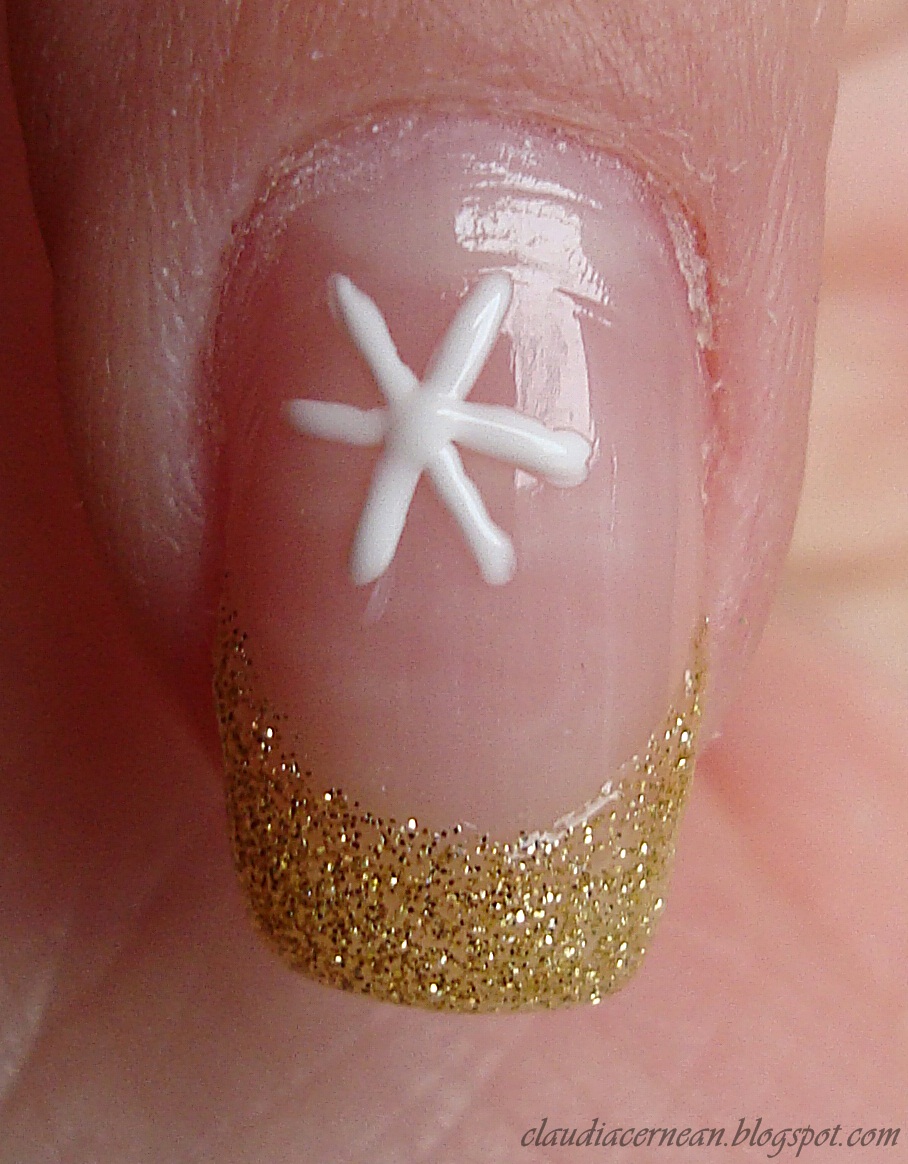
De data aceasta m-am gândit să fac fulgii puţin mai diferit decât data trecută, aşa că am început cu o linie diagonală făcută cu alb pentru degetul arătător:
This time, I thought to make the snowflakes a little bit different than the last time, so I began to make a diagonal line with white polish on the forefinger:

Fă un V de la mijlocul liniei în sus şi un altul în jos, iar la sfârşit vei obţine o stea cu şase vârfuri:
Make a V at the middle of the line in up and an another in down,so that at the end you will get a star with six peaks:


La sfârşitul fiecărui vârf fă V-uri, dar uneştele între ele:
At the end of each peak make a V and then merge them together:

Mie nu mi-a ieşit chiar perfect, însă am adăugat sclipici auriu, iar imperfecţiunile nu au mai fost atât de vizibile. Poţi să mai faci în spaţiul rămas liber puncte albe cu ajutorul unui punctator:
The snowflake I drew is not really a perfect one, but I added a gold glitter and the imperfections were harder to be seen. You can also make white dots in the free space with the dotting tool:


Pe degetul mic, la fel ca şi pe cel arătător, am făcut o linie diagonală cu alb şi două V-uri creând o stea cu şase vârfuri:
On the little finger, I drew a diagonal line with white and two V creating a star with six peaks:


Ca şi la fulgul de zăpadă anterior trebuie făcut câte un V la sfârşitul fiecărei linii , însă de data aceasta fără să fie unite între ele:
Likewise, for this model it is necessary to make a V at the end of each line, but this time they are separated:

Poţi de asemenea să mai adaugi puncte albe şi puţin sclipici auriu:
You can also add white dots and a little bit of gold glitter:


Pe degetul mijlociu am ales să fac un om de zăpadă. Prima dată desenează un cerc care va reprezenta capul şi un oval pentru corp, folosind pensula subţire şi lacul alb:
On the middle finger I chose to make the snowman. First time, draw a circle which represent the head and a oval for the body, using the thin brush and the white polish:


Colorează omul de zăpadă cu alb şi aşteaptă câteva minute să se usuce, iar apoi fă conturul ovalului cu negru:
Color the snowman with white and wait a few minutes for it to dry, and then make the oval contour with black:


Cu ajutorul punctatorului şi a lacului negru fă ochii, gura şi nasturii:
With the dotting tool and the black polish draw the eyes, the mouth and the buttons:

Cu pensula subţire şi lacul roşu fă-i omului de zăpadă un fular şi o căciuliţă de Crăciun, pe care o poţi contura cu negru, iar cu lac portocaliu fă un con pentru nas:
With the thin brush and the red polish make the snowman's neckcloth and the Christmas hat, which you can contour with black. And then, with the orange polish, make a cone for the nose:


Pentru a nu se vedea atât de tare marginea liberă a unghiei, eu am făcut-o cu puţin sclipici auriu:
In order that the free edge of the nail wouldn't be so visible, I used a little bit of gold glitter:

Pe unghia degetului inelar am făcut un brad cu ajutorul pensulei subţiri şi a lacurilor verzi. Pentru început trebuie lăsat puţin spaţiu liber în vârf pentru stea:
On the ring finger I draw a Christmas tree using the thin brush and the green nail polishes. For the beginning, you have to leave a little free space in the peak for the star:

Bradul o să fie format din linii subţiri intersectate la mijloc, iar steluţa e din cinci triunghiuri intersectate la bază colorată cu galben:
The Christmas tree is made of thin lines intersected at the middle and the star is made of five triangles intersected and coloured with yellow:


Mai trebuie adăugate doar câteva puncte albe şi roşii pe post de globuri, iar la baza bradului puţin lac alb pentru zăpadă:
You must also add some white and red dots as globes and at the base of the Christmas tree use a white polish for the snow:

La sfârşit foloseşte un lac transparent, după ce unghiile s-au uscat aproape în totalitate, pentru a căpăta un plus de strălucire.
At the end, after your nails are almost completely dry, use a top coat, in order to get an extra shine.
Ce frumi !
RăspundețiȘtergereMultumesc
Ștergerewell done, welcome to blogosphere :D
RăspundețiȘtergereThanks a lot :)
ȘtergereGreat tutorial! Welcome :)
RăspundețiȘtergereThanks. I'm glad you like it :*
ȘtergereCe drăguțe sunt, omulețul de zăpadă e tare simpatic :)
RăspundețiȘtergerePupici:*
Multumesc mult. Ma bucur ca iti plac :*
ȘtergereOh amazing! Great tutorial! ;)
RăspundețiȘtergereNice design! Thanks for the tutorial!
RăspundețiȘtergereThanks. I'm glad you like this tutorial :*
ȘtergereCe simpatice sunt :x
RăspundețiȘtergereYour nail art is amazing. Welcome to blogging world. I'm looking foward to see your next posts. :)
RăspundețiȘtergereThanks a lot. Tomorrow I will post a new article, I just hope to have time :*
ȘtergereCat de bine ti-au iesit :X arata superb!
RăspundețiȘtergereMersi mult de tot :*
Ștergere:)
RăspundețiȘtergereHi! I love your nail arts! I'm your new follower, and nail art is my passion too. If you want, take a look to my blog and follow me back.
RăspundețiȘtergerexx
Ely B's Little Corner
Christmas is surely in the air!! :) Love your designs... cute and pretty!!
RăspundețiȘtergereIt's gorgeous, elegant and festive!
RăspundețiȘtergereLovely!!!! thank you so much for your visit!!!
RăspundețiȘtergereI follow you with GFC now!
Have a wonderful weekend!
Besos, desde España, Marcela♥
Thank you too. I wish you happy holidays and a nice Sunday!
ȘtergereFoarte dragute!!Multumesc pentru abonare!!Pupici>:D<
RăspundețiȘtergereMa bucur ca iti plac. Iti multumesc si eu pentru abonare :*
ȘtergereCe unghii frumoase! Esti foarte talentata.
RăspundețiȘtergereTe invit si la concursul meu daca iti face placere :*
http://ioana08libeauty.blogspot.ro/2012/12/winter-competition.html
Mersi mult :*
ȘtergereSo beautiful!
RăspundețiȘtergereThanks :)
ȘtergereDoar luna aceasta ai inceput blogul? n-as fi zis pentru ca esti foarte talentata si blogul e foarte reusit!
RăspundețiȘtergereIti doresc succes!
Mi-as fi dorit sa il incep mai repede, dar nu prea aveam timp. Ma bucur ca iti place, iti doresc de asemenea mult succes :)
ȘtergereSuper cute... Thanks for the tutorial!!
RăspundețiȘtergereThanks a lot :)
ȘtergereWow! How much work went into these, they look great. I especially like the Santa one :)
RăspundețiȘtergereJanine xx
BakeGlueandTrend
Thank you :)
Ștergere